You can create a map and proceed with auto-map to create a mapping specification when source column names and target column names are same. For more information about creating maps, refer to the Creating Maps topic.
After creating a mapping specification, you can set the target update strategy and enter a description about the strategy.
Creating Mapping Specifications
To create mapping specifications using auto-map, follow these steps:
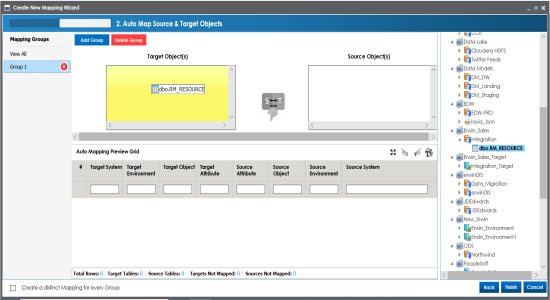
- On the Creating New Mapping Wizard page, drag the target table from the Metadata pane and drop it in the Target Object(s) box.
- Drag source table from the Metadata pane and drop it in the Source Object(s) box.
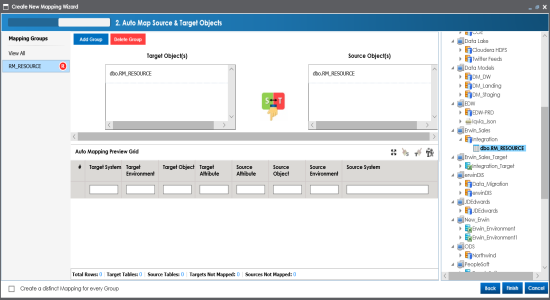
- Click
 .
. -
Maximize (
 )
)
Use this option to maximize or minimize the Auto Mapping Preview Grid.
-
Delete Orphan Sources (
 )
)
Use this option to delete source attributes that are not mapped.
- Delete Orphan Targets (
 )
) Use this option to delete target attributes that are not mapped.
- Add Transformations (
 )
) Use this option to add transformations for the auto map. You can add business rule, extended business rule transformation, look up reference column, lookup on, and trans look up condition.
- Add Group
Use this option to add a mapping group to perform other mappings.
- Rename Mapping Group (
 )
) Use this option to rename a mapping group.
- Delete Group
Use this option to delete a mapping group. To delete a mapping group, click the mapping group and then click Delete Group.
- Create a distinct Mapping for every Group
Use this option to create distinct mapping for every group.
- Click Finish.
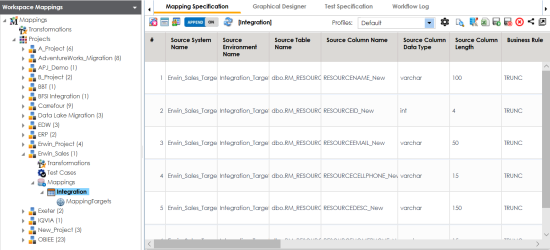
The source columns are mapped with the target columns under a mapping group with the target table name. The mappings can be previewed in the Auto Mapping Preview Grid, which gives information about the target and source tables.
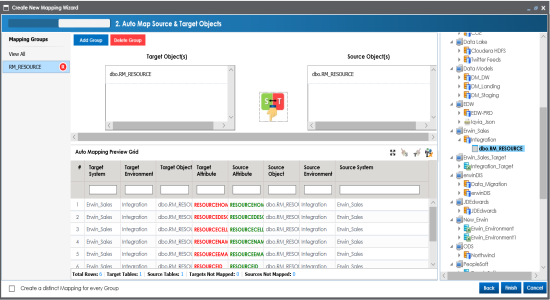
Use the following options to manage the auto-map:
A new map is created and saved under the Mappings tree. All the auto-maps in the multiple mapping groups appear in the same sequence in the Mapping Specification grid.
Setting Target Update Strategy
To specify target update strategy, follow these steps:
- Expand the Additional Mapping Information pane.
- Click the Target Update Strategy tab.
- Click
 .
. - Click the required strategy, enter Update Strategy Description, and click
 .
.
This pane is available at bottom of the central pane when you click a map in the Workspace Mappings pane.
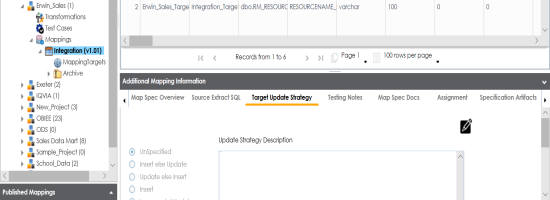
The target update strategy is set.
Adding Transformations
You can add transformations to an auto-map and specify whether it is applicable to exact match, orphan source, orphan target, or all the rows.
To add transformations in auto-maps, follow these steps:
- Under the Auto Mapping Preview Grid section, click .
- Click
 .
. - Double-click the cell under the Key column and select the required transformation.
- Double-click the cell under the Value column and select the value.
- Use the following options:
- Exact Match
- Use this option to apply the transformation on the exactly matched rows in the Auto Mapping Preview Grid.
- Orphan Source
- Use this option to apply the transformation on the orphan source rows in the Auto Mapping Preview Grid.
- Orphan Target
- Use this option to apply the transformation on the orphan target rows in the Auto Mapping Preview Grid.
- All
- Use this option to apply the transformation on every row in the Auto Mapping Preview Grid.
- Click .
The Auto Map Transformation page appears.
A row is added to the grid.
You can use transformations created under the Transformations node only for Business Rule. For other transformations, enter the required value.
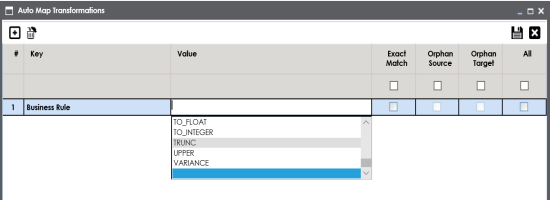
The transformations are added to the auto map.
You can enrich a mapping specification by:
- Adding transformation and lookup details
- Associating code cross walks (code mappings)
- Associating reference tables
- Linking requirements
After creating a mapping specification, you can analyze a mapping specification. Analyzing mapping specifications involves:
- Generating virtual preview of target
- Previewing data
- Performing table gap analysis
- Performing column gap analysis
- Running impact analysis
- Running lineage analysis
- Running end to end lineage
- Opening business view
- Viewing mapping statistics
|
|
|
Copyright © 2021 erwin, Inc. All rights reserved. Copyright © 2021 Quest Software Inc. All rights reserved. All trademarks, trade names, service marks, and logos referenced herein belong to their respective companies. |